Menu

Tuesday, July 29, 2014

Panchmel Dal / Pancharatna Dal ( Mix of Five Lentils )

.
Lentils/Dal form an important part of any Indian meal. Different variety and styles are used in different parts of the country. It means that you can try a different one every day.J Usually served as a side dish, it’s a tasty way to get your protein for the day.


Panchkuti / Panchmel Dal is a traditional lentil dish that was originated in Rajasthan. This tasty and nutritious dish of Rajasthan is a staple in almost every household in Rajasthani cuisine. Though it is generally served with famous Dal Batti, but also goes well with hot steamed rice or with Indian flat bread. Considered as extremely nutritious, a protein packed dish as it contains the goodness and nutritive qualities of 5 different lentils/dals. Panchamel dal is also known as panchratna dal. The word Panch means five and Ratna means jewels.J 

So as the name suggests, it is prepared from five different lentils. Split Urad dal, chana dal, whole masoor dal, split moong dal and toor / arhar dal are commonly used. Other ingredients that make this dish richer in taste and flavor are chopped tomato, cinnamon, cloves, cumin seeds, chopped green chilies, turmeric powder, grated ginger, lemon juice and some chopped cilantro. The lentils are first cooked in a pressure cooker till they are soft and then simmered together with other ingredients. 


First time I made this dal when I had small quantity of different dals in my kitchen. I was trying to use all of those together and so was searching for the recipe. I found the following one and tried out. The result was so delicious and aromatic that it has now become a favorite at my home. I have made few alterations, used onion and garlic, though it is delectable even without them. I have used pink lentil / Masoor dal in the place of whole masoor.

If you are in India, then you will get 5 different dals in one packet in most of the popular retail stores. Or you can also try with whatever variety you already have in your pantry. You would love the final product anyway J


Recipe of Panchmel Dal / Pancharatna Dal ( Mix of Five Lentils ) : serves 5 

Ingredients:

Mixed Dal / Lentils : 1 cup ( equal amounts of chana dal, green moong dal, masoor dal, Toor / arhar dal, urad dal)

Oil : 3 tablespoons
Asafoetida (hing) : 1/4 teaspoon
Cumin seeds : 1/2 teaspoon 
Red Chilies : 1 ( broken )
Green Cardamom : 3
Cinnamon stick : 1/2 inch
Cloves : 2 

Onion : 1 small one, finely chopped 
Garlic : 1 tablespoon, finely chopped or paste ( you can skip onion and garlic )
Ginger :1 teaspoon, grated 

Turmeric powder : 1/2 teaspoon
Red chili powder : 1/2 teaspoon ( as per your tolerance )
Coriander powder : 1 teaspoon 

Tomato : 1 medium, chopped 

Salt : to taste 
Cilantro : a handful, chopped 

Method :

1. Wash and soak all the lentils in water for half an hour. Now take the dal in a pressure cooker, add 3 to 4 cups of water. Close the lid and let it cook until 3 whistles come. You may cook the dal in a pot or a sauce pan, but it will take lot of time. Once dal is well-cooked, set it aside.

2. Take a big pan, add oil and heat it up. Add cumin seeds, green cardamoms, cinnamon stick, cloves and broken red chili to the pan, wait until they are fragrant. Now add asafoetida. 

3. (If you are using onion and garlic) Add chopped onion, stir it until it is translucent. Add the garlic, cook till the raw smell goes off. 

4. Add ginger, stir and mix it. Now add the turmeric powder, red chili powder and coriander powder. Stir it until oil starts coming out from the sides of the pan. Add the chopped tomato, add salt and cook it until tomato becomes soft. 

5. Once the spices are well cooked, add the cooked dal. Add salt, add water to get the right consistency. Simmer the dal for another 8 to 10 minutes.

6. Check the consistency, check seasoning. Add a handful of chopped cilantro and switch off the gas. Serve hot with rice or Indian flat bread.


Related Recipes, you also might like :

Yellow Mung with Bell Pepper

Bengali Style Cholar Dal

Friday, July 18, 2014

Oreo Mug Cake


After a week’s break, I am back with a new recipe of a Mug Cake. World cup ended with a sad note for our family. Because my husband is an old Argentina supporter and I liked Messi because of his innocence look. We got an opportunity to watch the match in a big screen organized in their office and first time I saw my husband so excited. Though my son started with supporting Messi, he changed his mind once Germany won. Because he has to always win! Anyway, besides that life was good in the peak of summer vacation. We had a road trip to Big Sur on Labor Day weekend, enjoyed some breathtaking views, long-drive on US-1 and eating out in different places on the way.


I am going to share the recipe of Oreo Mug Cake. It’s perfect if you have busy schedule and have no time to try any complex recipe. I love the concept of microwave mug cake. Stir a few ingredients in a mug and put it in the microwave for a minute or two and it’s ready to serve. When I tried the mug cake first time, I realized that microwaves can be used for other purposes than heating frozen meals or making popcorn. It’s not so new concept but I came across this easy recipe of making Mug Cake in microwave very recently.  My temptation got stronger when I saw that it needs only three ingredients to make. It's full of chocolate flavor and has a great texture. 


The end product came out really tasty, but not so spongy and not overly sweet. This recipe is flexible enough to be built with other flavor combos. You can make fun additions like chocolate chips, marshmallows or nuts or Nutella spread to the recipe. Or serve it with a topping of peanut butter or chocolate sauce or with a scoop of ice cream. I promise this would be your new favorite mid-night chocolate snack.


Recipe of Oreo Mug Cake : for one Mug cup 

Prep time: 5 minutes, Cook time: 2 minutes, Total time: 7 minutes 

Ingredients :

Oreo cookies : 9 pairs 
Baking powder : 1/2 teaspoon 
Milk : 1/2 cup 
Sugar : 1 tbsp ( If you do not like overly sweet can skip it, I do not add any sugar )

For toppings : Ice cream and chocolate sauce  (or whatever you like )

Method :

1. Crush the Oreo cookies(do not remove the cream of the cookies) roughly. You can use food processor or blender. Or take a Ziploc bag, put the cookies into it. Take a rolling pin and gently press it. 

2. Take a bowl transfer the crushed cookies to it. Add the baking powder and combine well. Add milk and mix the batter until incorporated. 

3. Grease a microwave safe cup with oil or non-stick cooking spray. Transfer the batter into the prepared cup. Microwave for 2 minutes. ( in regular microwave mode )

4. Let it cool down for 10 minutes and serve with a scoop of ice cream and chocolate sauce. 


Related Recipes, you also might like :


Tuesday, July 8, 2014

Chicken Dum Biryani ( Kolkata Style )


The dish that I am going to share today doesn't need any introduction. If you ask any Bengali about his/her favorite food, 90 percent chance is that the answer would be Biryani. Some may like Goat Biryani; others may like chicken or egg Biryani. Some will vote for the “shiraz” as the best restaurant for Biryani, others will go with “Aminia”. But they are all crazy about Biryani. Even in abroad, they can travel long distance only to find a good Biryani place. Here in any community program, if the lunch/dinner menu has Biryani, then the event surely attracts more people.


In my younger days, I made several attempts to make Biryani but the end result was not good. While I was in Florida, received a recipe of pressure cooked Biryani from one of my friends and was very excited to prepare it. But then what came out of the cooker was almost like khichdiJ. Later I learned Hyderabadi Chicken Biryani from our cook in Bangalore. Whenever I made this dish, my husband's concern is that it shouldn’t be that rich/oily that restaurant serves. Rather it should be moist and the rice should be soft. I had to agree with him that this tastes better.


For the people who are not so familiar with Indian dishes, let me give a brief introduction about Biryani. It’s a rice-based dish, made with chicken, mutton, fish, eggs or vegetables and spices. Biryani is a Persian dish and was introduced to India from Persia by the Muslims travelers or merchants of the Mughal Empire. It was one of the most popular dishes in the kitchen of the Mughal Emperors. Today I will share the recipe of Pakki Dum Calcutta Biryani. Other popular versions of Biryanis are Lucknow Biryani, Hyderabad Biryani, and Bombay Biryani.


There are two types of process in the cooking of Biryani. One is Kachchi Biryani and the other one is Pakki Biryani. Kachchi means raw, raw marinated meat is cooked with rice in this type of preparation. On the other hand, in Pakki Biryani the meat is marinated for a shorter time, and cooked before being layered with the rice.  Biryani is traditionally cooked in earthenware pot which gives it a unique flavorThe pot is usually sealed with wheat dough to allow cooking in its own steam and not opened till it is ready to serve.  Biryani is mostly served with boiled egg, mixed salad and with a spicy yogurt based drink called Borhani or Raita. 


Recipe of Authentic Chicken Biryani: Serves 3 to 4 

Ingredients :

For Biryani Masala :

Fennel:1/2 tsp
Shah jeera / Black Cumin seeds:1/2 tsp
Cloves: 4
Cinnamon: 2-inch stick
Cardamom: 4-5
Black Cardamom : 1Nutmeg (grated) :1/4 tsp
Mace - 1 floret
Star anise: 1
Black peppercorn: 5-6

To Cook Chicken: 

Chicken: 2 lbs or 800 g, cut into big sizes 
Yogurt: 4 to 5 tablespoons 
Garlic paste: 2 tablespoons
Ginger paste: 1 tablespoon 
Biryani Masala: 1 1/2 tablespoons 
Red chili powder: 1 teaspoon 
Salt : 
Onion: 3 medium sized, thinly sliced 

For Rice : 

Basmati rice : 3 cups 
Salt : 
Black peppercorn : 5-6
Cinnamon : 1 stick 
Cardamom : 2-3 
Clove : 2-3 
Bay leaves : 2 

Other Ingredients: 

Potato: 2 medium sized, boiled and cut into two halves 
Hard boiled egg: 3
Milk: 1/4 cup, warm
Saffron strands: few 
Oil: 4-5 tablespoons 
Ghee / clarified butter : 5-6 tablespoons 

Kewra essence: 4-5 drops ( use it to get authentic taste or flavor or you may skip it too)
Rose water: 1 teaspoon

Method : 

1. To make the Biryani Masala, first dry roast all the spices, till they are aromatic. Let it cool down and grind it to a powder. Biryani Masala is ready. Set it aside 1 and 1/2 tablespoons for use and rest you can store it in an airtight box for a couple of months. 

2. Wash and pat dry the chicken pieces. In a big bowl, add yogurt, ginger-garlic paste, salt, red chili powder and 1 and 1/2 tablespoons Biryani masala. Mix together well and add the chicken pieces to the bowl. Rub the marinade all over chicken pieces gently. Wrap the bowl tightly with a plastic wrap and place it in the refrigerator. Let it sit for overnight or at least 3 to 4 hours.

3. Now take a big pan, add oil and heat it up. Once the oil is ready, add the boiled halved potatoes and fry them till the color changes to golden brown. Once potatoes are done set it aside. In the same oil add the hard-boiled eggs and fry it till they have the brown spot on their surface. Take it out from the pan and keep it aside. 

4. In the same pan, add oil (if required) and add the sliced onions. Fry it till the color changes to golden brown. Add the marinated chicken, stir and cook until chicken is well cooked and oil starts to separate from the spice mixture. Once it is done set it aside.


5. Next step, preparing the rice: Wash and soak the rice in water for 10 minutes. Take a small piece of cloth, then put cardamom, cinnamon, cloves and peppercorn in it and tie a knot. 


6. Now take a deep bottomed pan, add enough water ( 7 cups ), add the tied cloth, add salt and bay leaves. Once water starts boiling, add the rice. Cook it until rice is 80 % done. Drain away the extra water and spread the rice on a flat surface. 


7. Take a small bowl, add the milk and saffron strands. Mix well and let it rest for a couple of minutes. 


8. Layering or final cooking:  Stove-top method: Take a large heavy bottom pan with the lid. Add 2-3 tablespoons ghee ( melted ) to the pan. Spread it nicely and add a layer of rice ( using half of the rice). Then add the cooked chicken, potatoes, eggs. Sprinkle 1 teaspoon of Biryani Masala and ghee. Now again add a layer of rice and sprinkle 1-2 tablespoons of ghee. Add the saffron milk and kewra essence and rose essence. 

9. Put the lid on, seal it with flour dough and let it cook over lowest possible heat. Cook for 30 to 40 minutes. Make sure the pan is heavy bottomed and keep the flame lowest so that the rice does not get burnt on the bottom of the pan.


Oven Method: You can use the oven instead of stove top for final cooking. For that process, preheat the oven to 350 degrees F or 176 degrees C and take an oven-safe dish. Add 2-3 tablespoons ghee ( melted ) to the pan. Spread it nicely and add a layer of rice ( using half of the rice). Then add the cooked chicken, potatoes, eggs. Sprinkle 1 teaspoon of Biryani Masala and ghee. Now again add a layer of rice and sprinkle 1-2 tablespoons of ghee. Add the saffron milk and kewra essence and rose essence. cover it tightly with aluminum foil and let it cook in the oven for 30 minutes.


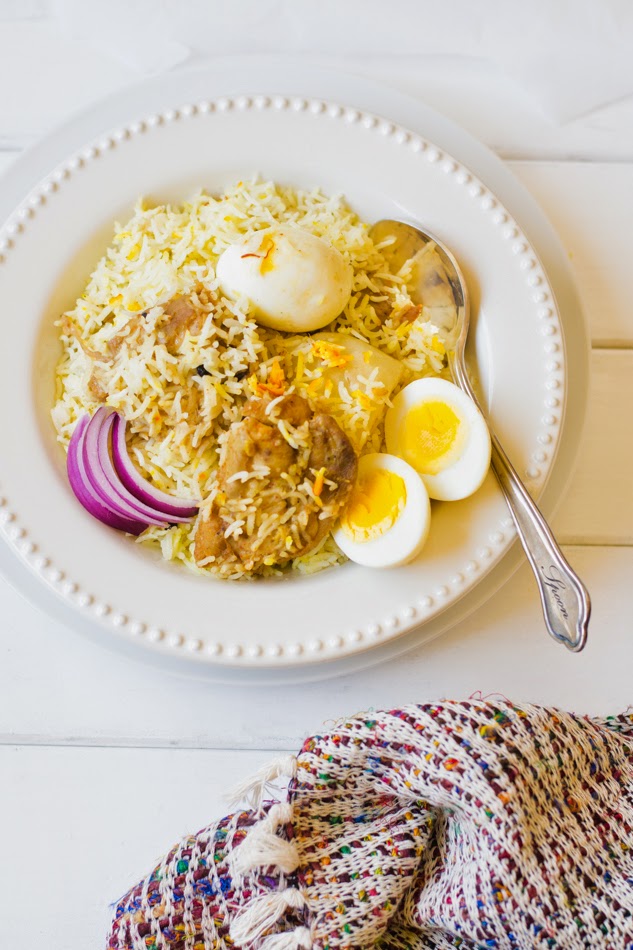
 10. Switch off the gas, or oven. Let the dish covered for again 10 to 15 minutes on the kitchen counter top, then mix the rice and chicken gently together. Transfer it to a serving plate and serve with salad.

========================================================================

Short Cut way of making Chicken Biryani 

Ingredients

Chicken: 2 lbs or 800 g, cut into big sizes 
Yogurt: 4 to 5 tablespoons 
Garlic paste: 2 tablespoons
Ginger paste: 1 tablespoon 
Biryani Masala: 1 1/2 tablespoons 
Red chili powder: 1 teaspoon 
Salt : 
Biryani Masala: preferably Shan 


Onion: 3 medium sized, thinly sliced 

Basmati rice: 3 cups 

Potato: 3 medium sized, boiled and cut into two halves 
Hard boiled egg: 3
Milk: 1/4 cup, warm
Saffron strands: few 
Oil: 4-5 tablespoons 
Ghee / clarified butter : 3-4 tablespoons 

Kewra essence: 2-3 drops ( use it to get authentic taste or flavor or you may skip it too)

Rose water: 1 teaspoon

Method:

1. Take a big pan, add oil and heat it up. Once the oil is ready, add the boiled halved potatoes and fry them till the color changes to golden brown. Once potatoes are done set it aside. In the same oil add the hard-boiled eggs and fry it till they have the brown spot on their surface. Take it out from the pan and keep it aside. 

2. In the same pan, add oil (if required) and add the sliced onions. Fry it till the color changes to golden brown. Add ginger and garlic paste, fry it until raw smell goes off. Add the chicken pieces, add 4 tablespoons of Biryani Masala. Stir and cook till the chicken changes the chicken pieces changes color from pink to brown. Add the yogurt and mix it well. Add salt and red chili powder. Stir and cook until chicken is well cooked and oil starts to separate from the spice mixture. Add the potato pieces to the chicken. Stir to mix, once it is done set it aside.

3. Next step, preparing the rice: Wash and soak the rice in water for 10 minutes. Take a deep bottomed pan, add enough water. Add salt and 2 tablespoons of Biryani Masala. Once water starts boiling, add the rice. Cook it until rice is 80 % done. Drain away the extra water and spread the rice on a flat surface. 

4. Take a small bowl, add the milk and saffron strands. Mix well and let it rest for a couple of minutes.

5. Preheat the oven to 350 degrees F or 176 degrees C and take an oven-safe dish. Add 2-3 tablespoons ghee ( melted ) to the pan. Spread it nicely and add a layer of rice ( using half of the rice). Then add the cooked chicken, potatoes, eggs. Sprinkle 1 teaspoon ghee. Now again add a layer of rice and sprinkle 1-2 tablespoons of ghee. Add the saffron milk and kewra essence and rose essence. cover it tightly with aluminum foil and let it cook in the oven for 30 minutes.

6. Switch off the oven. Let the dish covered for again 10 to 15 minutes on the kitchen counter top, then mix the rice and chicken gently together. Transfer it to a serving plate and serve with salad.


Related Recipes, you might also like :